

글로벌 서비스를 개발할 때 다국어 지원은 필수적인 기능입니다. HTTP의 Accept-Language 헤더를 활용하면 사용자의 언어 설정에 따라 자동으로 적절한 언어로 서비스를 제공할 수 있습니다. 이번 글에서는 HTTP 기초부터 Spring Boot에서 Accept-Language를 활용한 다국어 서비스 구현까지 알아보겠습니다.
이 글에서 사용한 예제 코드는 GitHub 레포지토리에 정리해 두었습니다.
자세한 내용은 글 하단의 링크를 참고해주세요.
HTTP 기초 이해하기
HTTP란?
HTTP(HyperText Transfer Protocol)는 웹에서 클라이언트와 서버 간의 통신을 위한 프로토콜입니다. 요청-응답(Request-Response) 모델을 기반으로 하며, 클라이언트가 서버에 요청을 보내면 서버가 응답을 반환하는 방식으로 작동합니다.
HTTP 헤더의 역할
HTTP 헤더는 요청과 응답에 대한 메타데이터를 전달합니다. 헤더는 다음과 같은 정보를 포함할 수 있습니다:
- 컨텐츠 타입 및 인코딩 정보
- 인증 및 권한 정보
- 캐싱 정책
- 클라이언트의 언어 선호도
Accept-Language 헤더 알아보기
Accept-Language란?
Accept-Language 헤더는 클라이언트가 선호하는 언어를 서버에 알려주는 HTTP 요청 헤더입니다. 브라우저는 사용자의 언어 설정을 기반으로 이 헤더를 자동으로 설정합니다.
Accept-Language 헤더 구조
Accept-Language: ko-KR,ko;q=0.9,en;q=0.8,en-US;q=0.7이 헤더는 다음과 같이 해석됩니다:
ko-KR: 한국어(대한민국) - 우선순위 1.0 (기본값)ko: 한국어(일반) - 우선순위 0.9en: 영어(일반) - 우선순위 0.8en-US: 영어(미국) - 우선순위 0.7
언어 태그 형식
언어 태그는 다음과 같은 형식을 따릅니다:
ko: 언어 코드만ko-KR: 언어-국가 코드 -> en-US(미국 영어)와 en-GB(영국 영어), zh-CN(중국 간체)와 zh-TW(대만 번체) 등zh-Hans-CN: 언어-문자체계-국가 코드
품질 값(q-value)
품질 값은 0.0부터 1.0까지의 값으로, 클라이언트의 언어 선호도를 나타냅니다:
- 1.0: 가장 선호 (기본값, 생략 가능)
- 0.8: 높은 선호도
- 0.5: 보통 선호도
- 0.0: 허용하지 않음
Spring Boot에서 다국어 서비스 구현하기
국제화 하는 두 가지의 방법
| 구분 | messages.properties | DB 방식 |
| 구현 복잡도 | 간단(스프링 기본 기능) | 복잡(테이블 설계) |
| 성능 | 빠름(메모리 로드) | 느림(DB 조회 필요) |
| 관리 편의성 | 파일 수정 후 재배포 해야하므로 개발자만 수정 가능 | 실시간 수정 가능 |
| 버전 관리 | 쉬움 | 어려움 |
1. 국제화 설정
@Configuration
class LocaleConfig {

    @Bean
    fun localeResolver(): LocaleResolver {
        val resolver = AcceptHeaderLocaleResolver().apply {
            // 🛡️ 보안 & 성능 - DB에 있는 언어만 처리
            setSupportedLocales(
                listOf(
                    Locale.ENGLISH,    // "en"
                    Locale.KOREAN,     // "ko"
                    Locale.JAPANESE,   // "ja"
                    Locale.CHINESE     // "zh"
                )
            )
            // 🎯 예측 가능한 기본값 - 매우 중요!
            setDefaultLocale(Locale.ENGLISH)
        }

        return resolver
    }
}
2. 메시지 파일 생성
src/main/resources/ 디렉토리에 언어별 메시지 파일을 생성합니다:
messages.properties (기본)
hello=안녕하세요
welcome=환영합니다
user.name=사용자 이름
user.email=이메일
button.save=저장
button.cancel=취소
messages_en.properties
hello=Hello
welcome=Welcome
user.name=User Name
user.email=Email
button.save=Save
button.cancel=Cancel
messages_ja.properties
hello=こんにちは
welcome=ようこそ
user.name=ユーザー名
user.email=メール
button.save=保存
button.cancel=キャンセル
3. 컨트롤러 구현
@RestController
class HelloController(
    private val messageSource: MessageSource
) {

    @GetMapping("/hello", produces = ["text/plain;charset=UTF-8"])
    fun hello(locale: Locale): String {
        val locale = LocaleContextHolder.getLocale()
        val text = messageSource.getMessage("hello", null, locale)
        return text
    }

}
4. MessageSourceConfig
/**
 * DB에서 데이터를 가져오는 방법이 아니라면 필요
 */
@Configuration
class MessageSourceConfig {
    @Bean
    fun messageSource(): MessageSource =
        ReloadableResourceBundleMessageSource().apply {
            setBasenames("classpath:messages")
            setDefaultEncoding("UTF-8")
            setCacheSeconds(1) // 1초마다 파일 변경 확인
        }
}- messages.properties 파일을 서버 재시작 하지 않고 1초에 한번씩 파일 변경 확인
- 명시적인 UTF-8 인코딩으로 한글 등 다국어 문자가 깨지지 않도록 보장
5. 엔티티 클래스 만들기
@Entity
@Table(name = "products")
class Product(
    @Id
    @GeneratedValue(strategy = GenerationType.IDENTITY)
    val id: Long? = null,

    @Column(nullable = false, length = 255)
    var sku: String,             // 비즈니스용 코드(선택)

    @Column(nullable = false, length = 255)
    var defaultTitle: String = "",

    @Column(columnDefinition = "TEXT")
    var defaultDescription: String? = null,
) {
    // JPA용 기본 생성자
    constructor() : this(null, "", "", null)

}

@Entity
@Table(
    name = "product_localization",
    uniqueConstraints = [UniqueConstraint(columnNames = ["product_id", "locale"])]
)
class ProductLocalization(
    @Id
    @GeneratedValue(strategy = GenerationType.IDENTITY)
    val id: Long? = null,

    @ManyToOne(fetch = FetchType.LAZY, optional = false)
    @JoinColumn(name = "product_id", nullable = false)
    @OnDelete(action = OnDeleteAction.CASCADE)
    var product: Product? = null,

    @Column(nullable = false, length = 10)
    var locale: String,    // "en", "ko", "ja", "en-US" 등

    @Column(nullable = false, length = 255)
    var title: String,

    @Column(columnDefinition = "TEXT")
    var description: String? = null,
) {
    // JPA용 기본 생성자
    constructor() : this(null, null, "", "", null)
}
6. DB 사용해서 다국어 처리하기
Locale 클래스 사용
@RestController
@RequestMapping("/api/products")
class ProductController(
    private val productReadService: ProductReadService,
) {

    @GetMapping("/{id}")
    fun getProduct(
        @PathVariable id: Long,
        locale: Locale, // Spring이 자동으로 http 헤더의 locale 설정을 주입해줌
    ): ResponseEntity<ProductDto> {

        val languageCode = locale.language.ifBlank { "en" }
        val dto = productReadService.get(productId = id, locale = languageCode)

        return ResponseEntity.ok()
            .header(HttpHeaders.CONTENT_LANGUAGE, languageCode)
            .body(dto)
    }
}
6. ProductService
@Service
class ProductReadService(
    private val productRepository: ProductRepository,
    private val productLocRepo: ProductLocRepository,
) {
    fun get(productId: Long, locale: String): ProductDto {
        val product = productRepository.findById(productId).orElseThrow {
            ResponseStatusException(HttpStatus.NOT_FOUND, "product not found")
        }

        val loc = productLocRepo.findFirstByProduct_IdAndLocale(productId, locale)

        return if (loc != null) {
            ProductDto(product.id!!, loc.title, loc.description)
        } else {
            // 번역이 한 건도 없으면 기본값 사용
            ProductDto(product.id!!, product.defaultTitle, product.defaultDescription)
        }
    }
}

data class ProductDto(
    val id: Long,
    val title: String,
    val description: String?
)
7. 웹 설정
@Configuration
class WebConfig : WebMvcConfigurer {
@Bean
fun stringHttpMessageConverter() =
StringHttpMessageConverter(StandardCharsets.UTF_8)
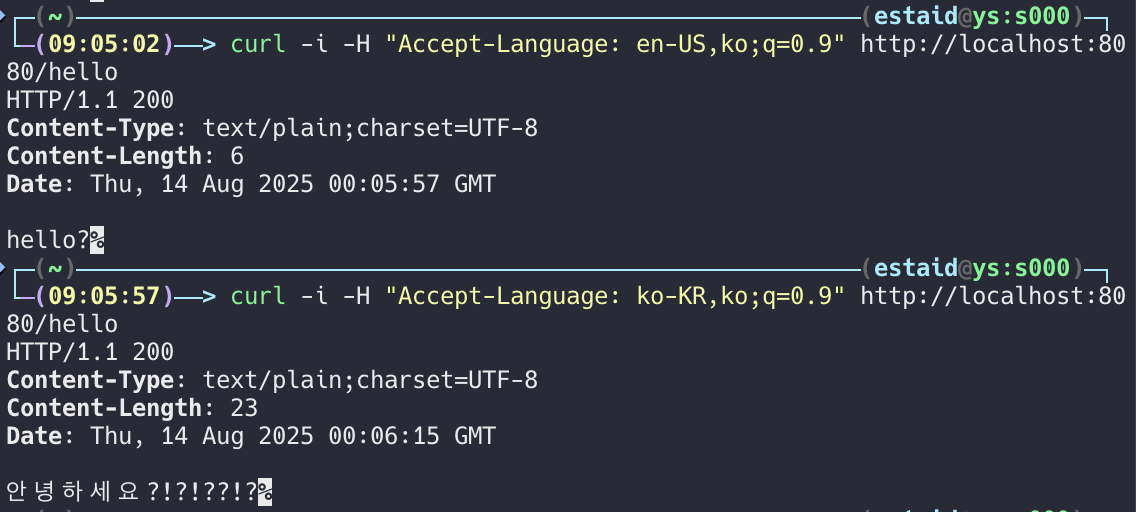
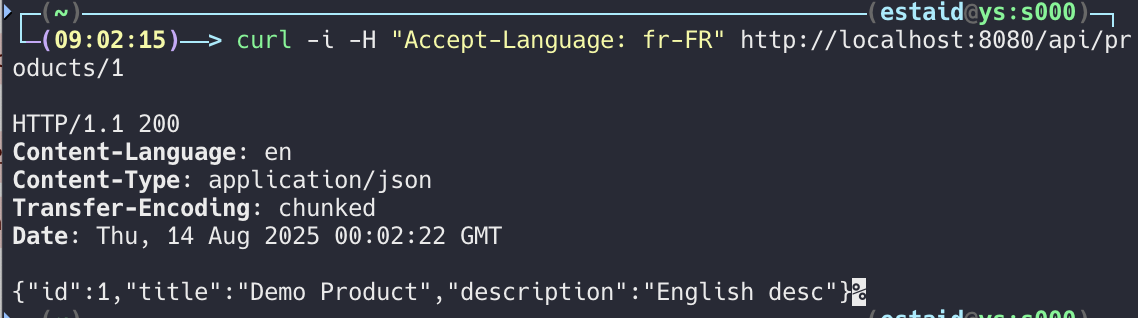
}1. cURL을 사용한 테스트


해당 코드들을 참고 할 수 있는 레포지토리를 공유해드립니다.
https://github.com/HongYeseul/spring-boot-locale-demo
GitHub - HongYeseul/spring-boot-locale-demo
Contribute to HongYeseul/spring-boot-locale-demo development by creating an account on GitHub.
github.com
'알아두면 좋은 개발 지식 > 스터디' 카테고리의 다른 글
| [K-DEVCON] 시스템 디자인 스터디2 - 3주차 후기(3장 구글 맵) (1) | 2025.12.30 |
|---|---|
| 25년 7월 (0) | 2025.08.03 |
| [KSUG] 기초 지식 스터디 2회차 요약 (2) | 2025.08.03 |
| 스프링 부트에 대한 간단한 고찰 - 2 (4) | 2025.07.31 |
| [KSUG] 기초 지식 스터디 1회차 요약 (3) | 2025.07.28 |